> ## Documentation Index
> Fetch the complete documentation index at: https://docs.internal.nscale.com/llms.txt
> Use this file to discover all available pages before exploring further.
# Instances
An instance is a virtual machine running on Nscale GPU or CPU infrastructure. It lives inside a VPC, is protected by a security group, and runs a base image (pre-provisioned, custom, or snapshot). Instances are the primary way to run workloads that need direct machine access.
**Prerequisites:** Before creating an instance you need a [VPC network](/docs/network/vpc-networks) and at least one [security group](/docs/network/security-groups) in that VPC. Optionally prepare a [custom image](/docs/storage/custom-images) or [snapshot](/docs/storage/snapshots) if you don't want a pre-provisioned image.
## Summary
This page walks you through creating a **compute instance** in the Nscale Console UI—selecting where it lives (project + region), attaching networking and security controls, and choosing what it runs (CPU/GPU + image).
Use this guide if you:
* Manage infrastructure for workloads that need **direct VM access**
* Need to spin up **CPU or GPU** compute in an existing project
* Want a repeatable, UI-driven process for provisioning instances
## Availability
This service is currently only available in the **reserved cloud service environment.**
If you **create or delete more than 30 instances** at the same time, the instance **provision/deletion time will increase**. Instance creation or deletion is **limited to 50 at a time**.
## Requirements
Before you start, you need:
* A project to place the instance into (instances are allocated to projects). If you’re not sure which project to choose, see [Projects](/docs/manage/projects) for more detail.
* A deployment region selected (you choose this during creation, and it appears in the instance details and status)
* A project network (VPC) created
* At least one security group created and associated with that network
**Naming rules:** Instance names must be **unique** and contain only **alphanumeric characters and hyphens**. Names are **immutable** — you cannot rename an instance after creation. Choose a descriptive name upfront.
## Instance lifecycle
Instances move through the following states:
| State | Description |
| - | - |
| **Queued** | The instance creation request has been accepted and is waiting for resources |
| **Building** | Resources have been allocated and the instance is being built |
| **Provisioning** | The instance is being configured and prepared for use |
| **Running** | The instance is active and ready for use |
| **Stopped** | The instance is shut down but can be restarted |
| **Error** | Something went wrong during provisioning or operation |
**Actions you can take:**
* **Stop** a running instance to pause it.
* **Start** a stopped instance to resume it
* **Create a snapshot** to save a point-in-time copy of the instance's disk
* **Delete** an instance to permanently remove it
**Deleting an instance is permanent.** All data on the instance's local disk is lost. If you need to preserve the disk contents, [create a snapshot](/docs/storage/snapshots) before deleting.
## Step-by-step
1. In the Console, open your project, then go to **Compute → Instances**
* You should now see the Instances list view
2. Click the **New Instance** button
* You will now see the instance creation form / wizard where you will fill in basic details
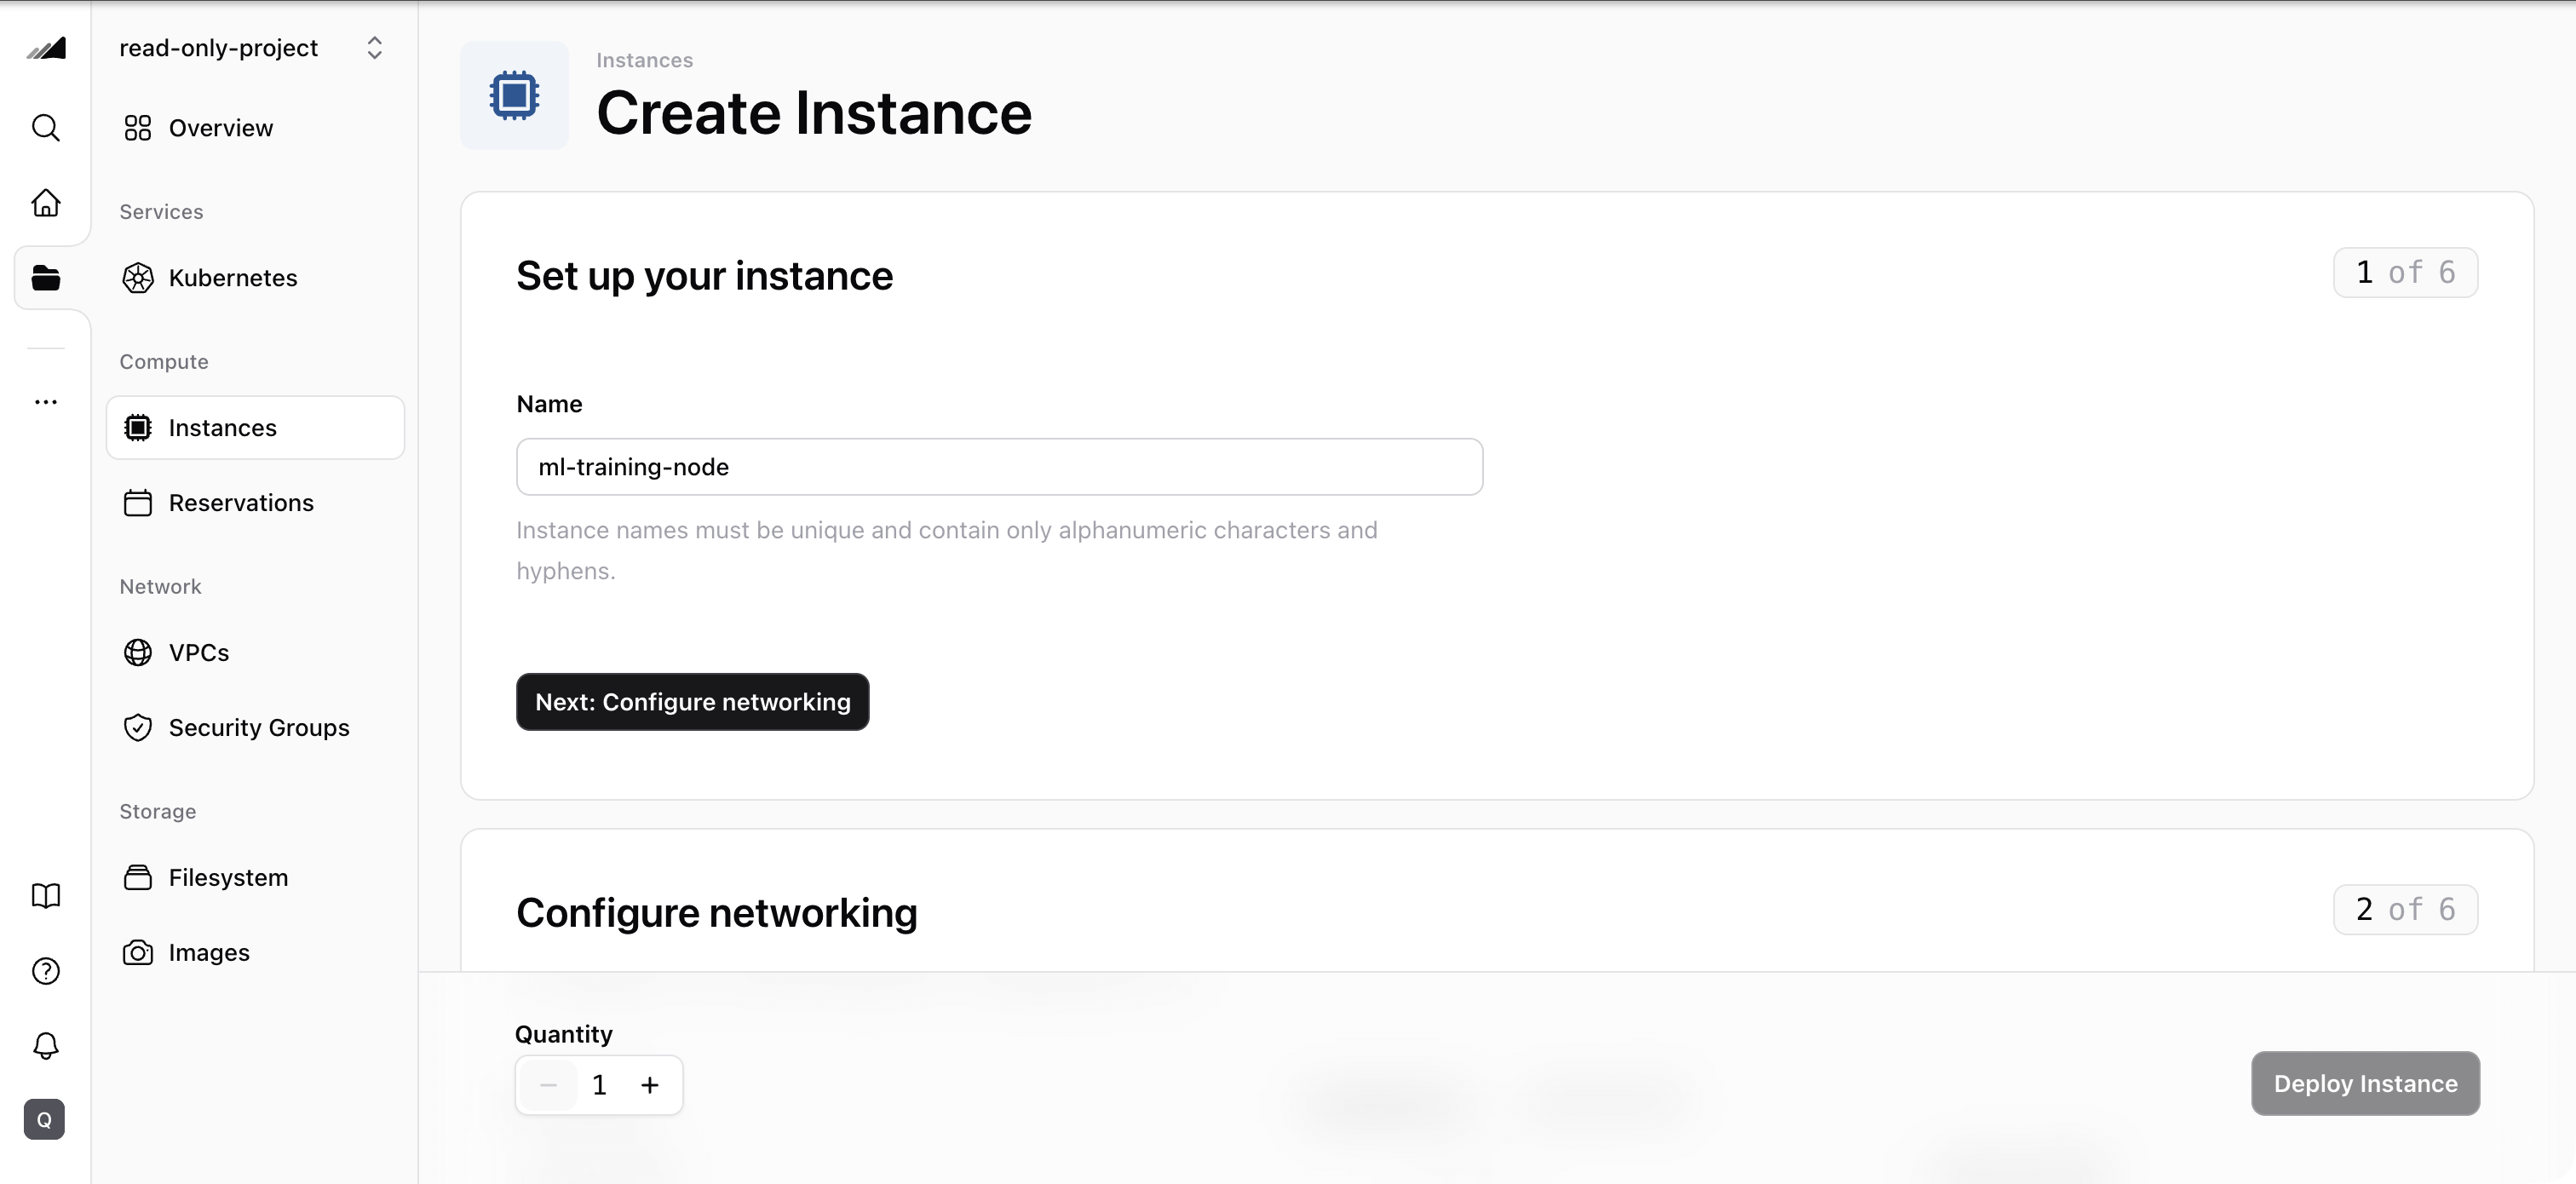 3. Fill in the **basic details**:
* **Name**: must be **unique** and contain only **alphanumeric characters and hyphens**
* **Project**: select the project where the instance will be created
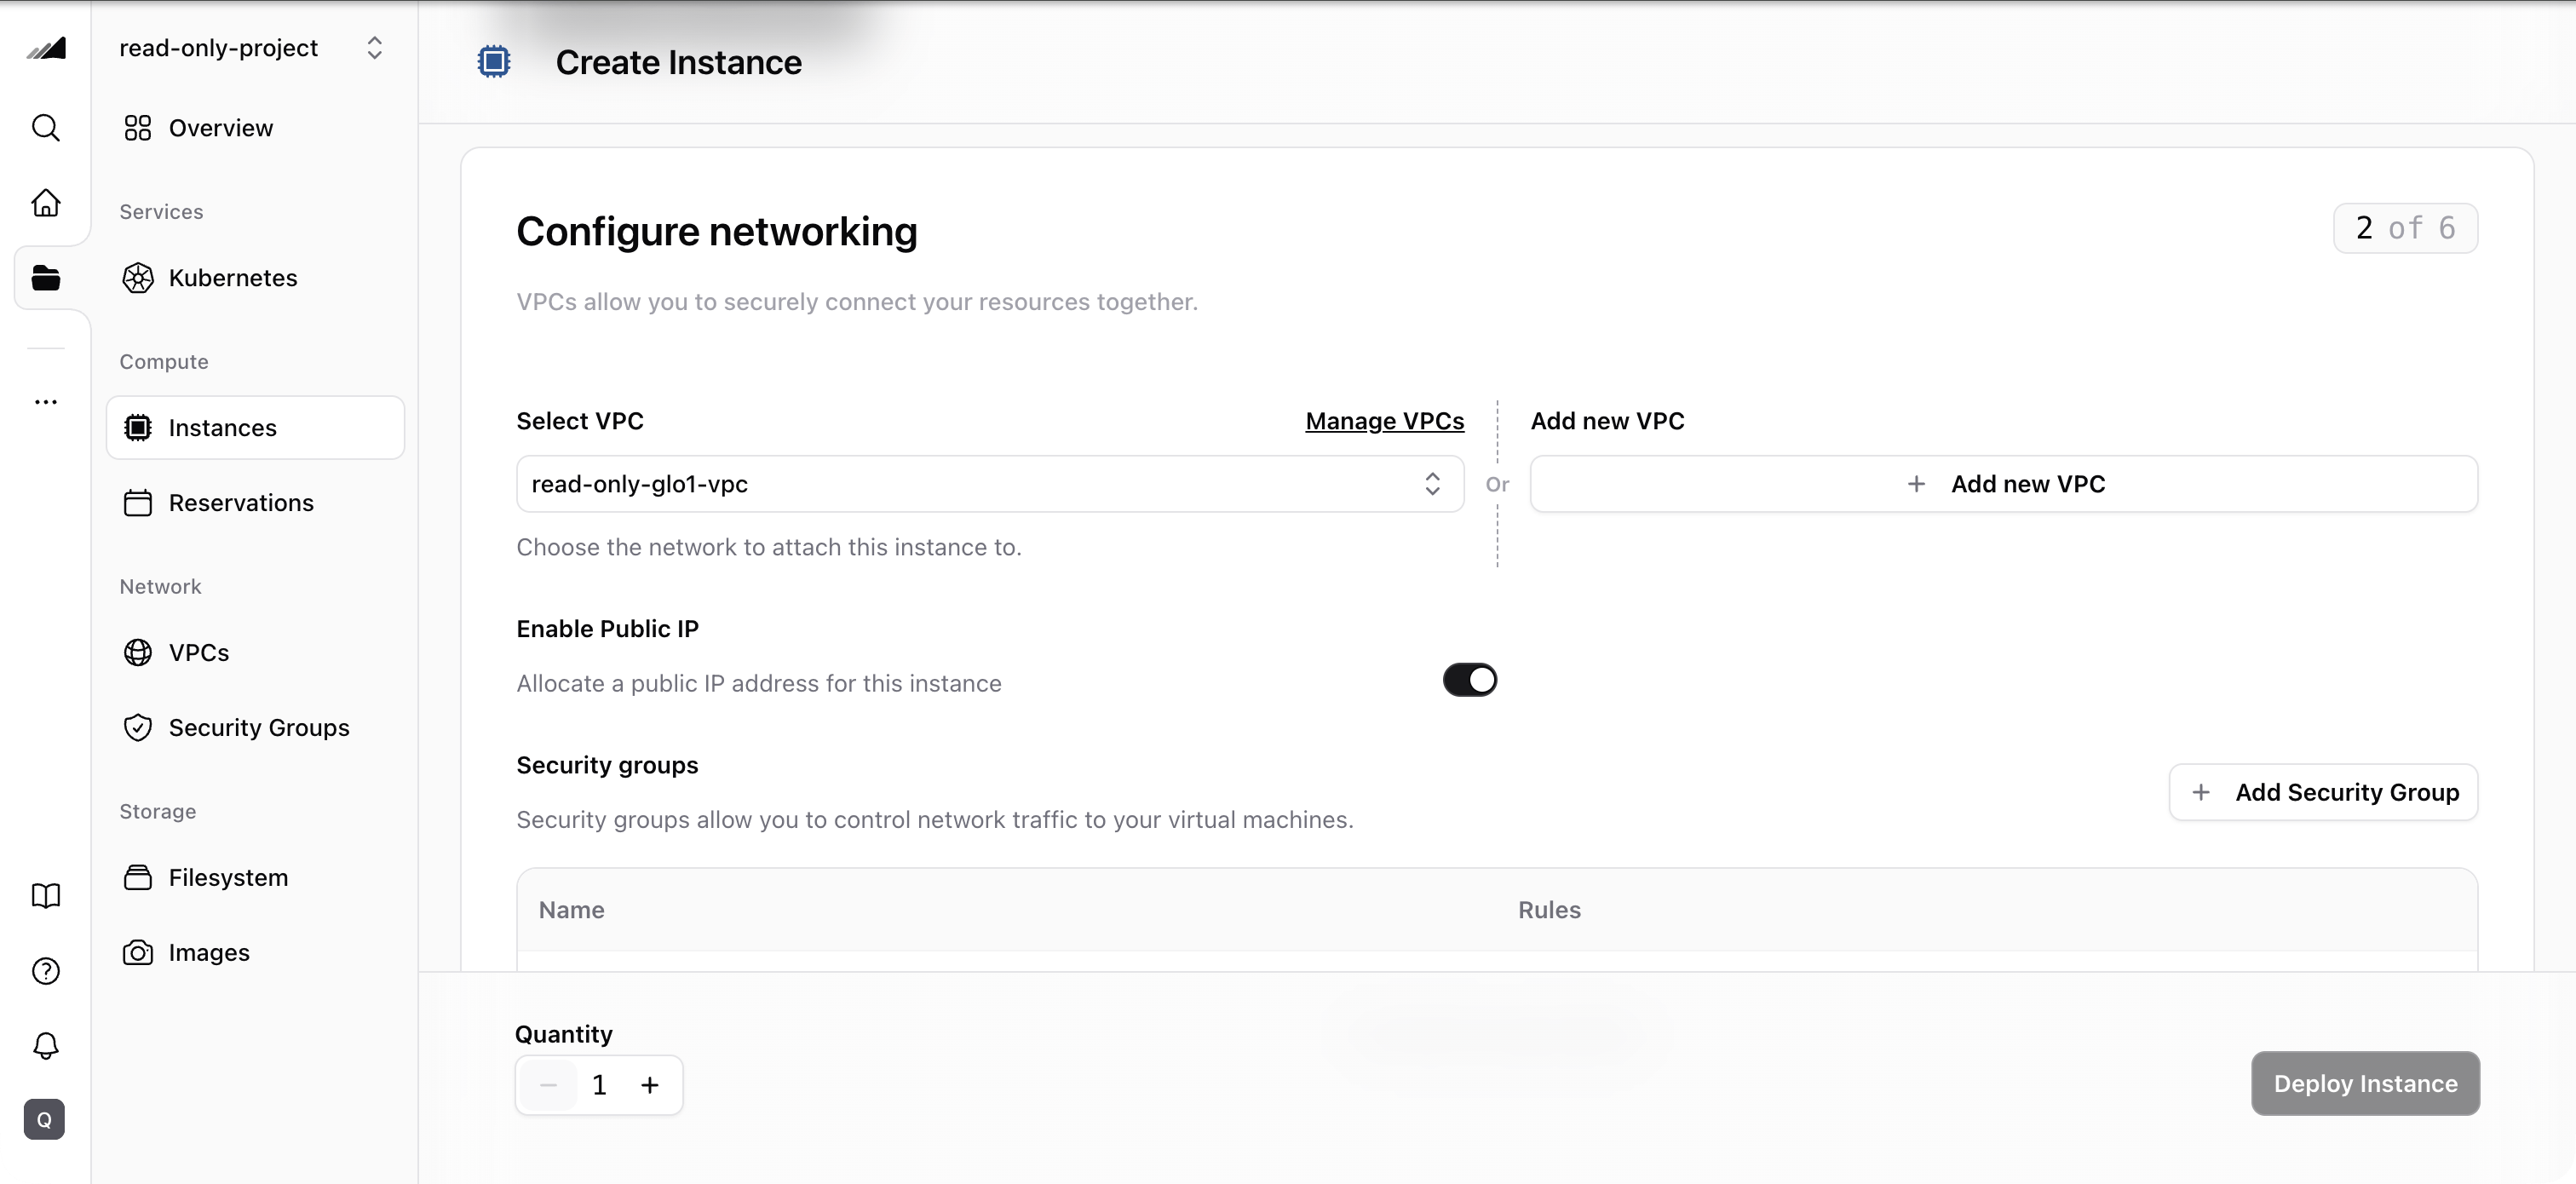
4. Configure networking:
* Select or create a new **VPC (network)** to attach the instance to
* Select or create a new **security group** to control inbound/outbound traffic
* Confirm you've selected the intended VPC and security group before continuing
3. Fill in the **basic details**:
* **Name**: must be **unique** and contain only **alphanumeric characters and hyphens**
* **Project**: select the project where the instance will be created
4. Configure networking:
* Select or create a new **VPC (network)** to attach the instance to
* Select or create a new **security group** to control inbound/outbound traffic
* Confirm you've selected the intended VPC and security group before continuing
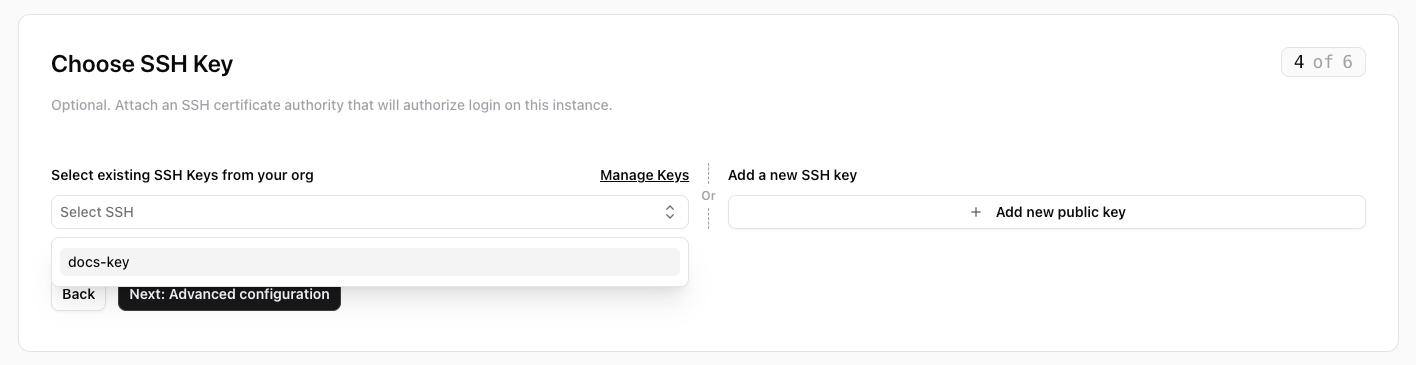
 5. Choose an SSH key (optional):
* Under **Select existing SSH Keys from your org**, choose an SSH certificate authority to authorize login on the instance. Use the **Manage Keys** link to jump to the SSH Certificate CAs settings.
* Alternatively, under **Add a new SSH key**, click **Add new public key** to register a new key without leaving the wizard.
* If you don't need certificate-based SSH access, skip this step. You can still use other SSH methods (cloud-init, manual key injection) after provisioning.
**New to SSH CAs?** See the [SSH certificate authorities guide](/docs/compute/ssh-certificate-authorities) for a full walkthrough of generating a CA key pair, registering it, signing user keys, and connecting.
5. Choose an SSH key (optional):
* Under **Select existing SSH Keys from your org**, choose an SSH certificate authority to authorize login on the instance. Use the **Manage Keys** link to jump to the SSH Certificate CAs settings.
* Alternatively, under **Add a new SSH key**, click **Add new public key** to register a new key without leaving the wizard.
* If you don't need certificate-based SSH access, skip this step. You can still use other SSH methods (cloud-init, manual key injection) after provisioning.
**New to SSH CAs?** See the [SSH certificate authorities guide](/docs/compute/ssh-certificate-authorities) for a full walkthrough of generating a CA key pair, registering it, signing user keys, and connecting.
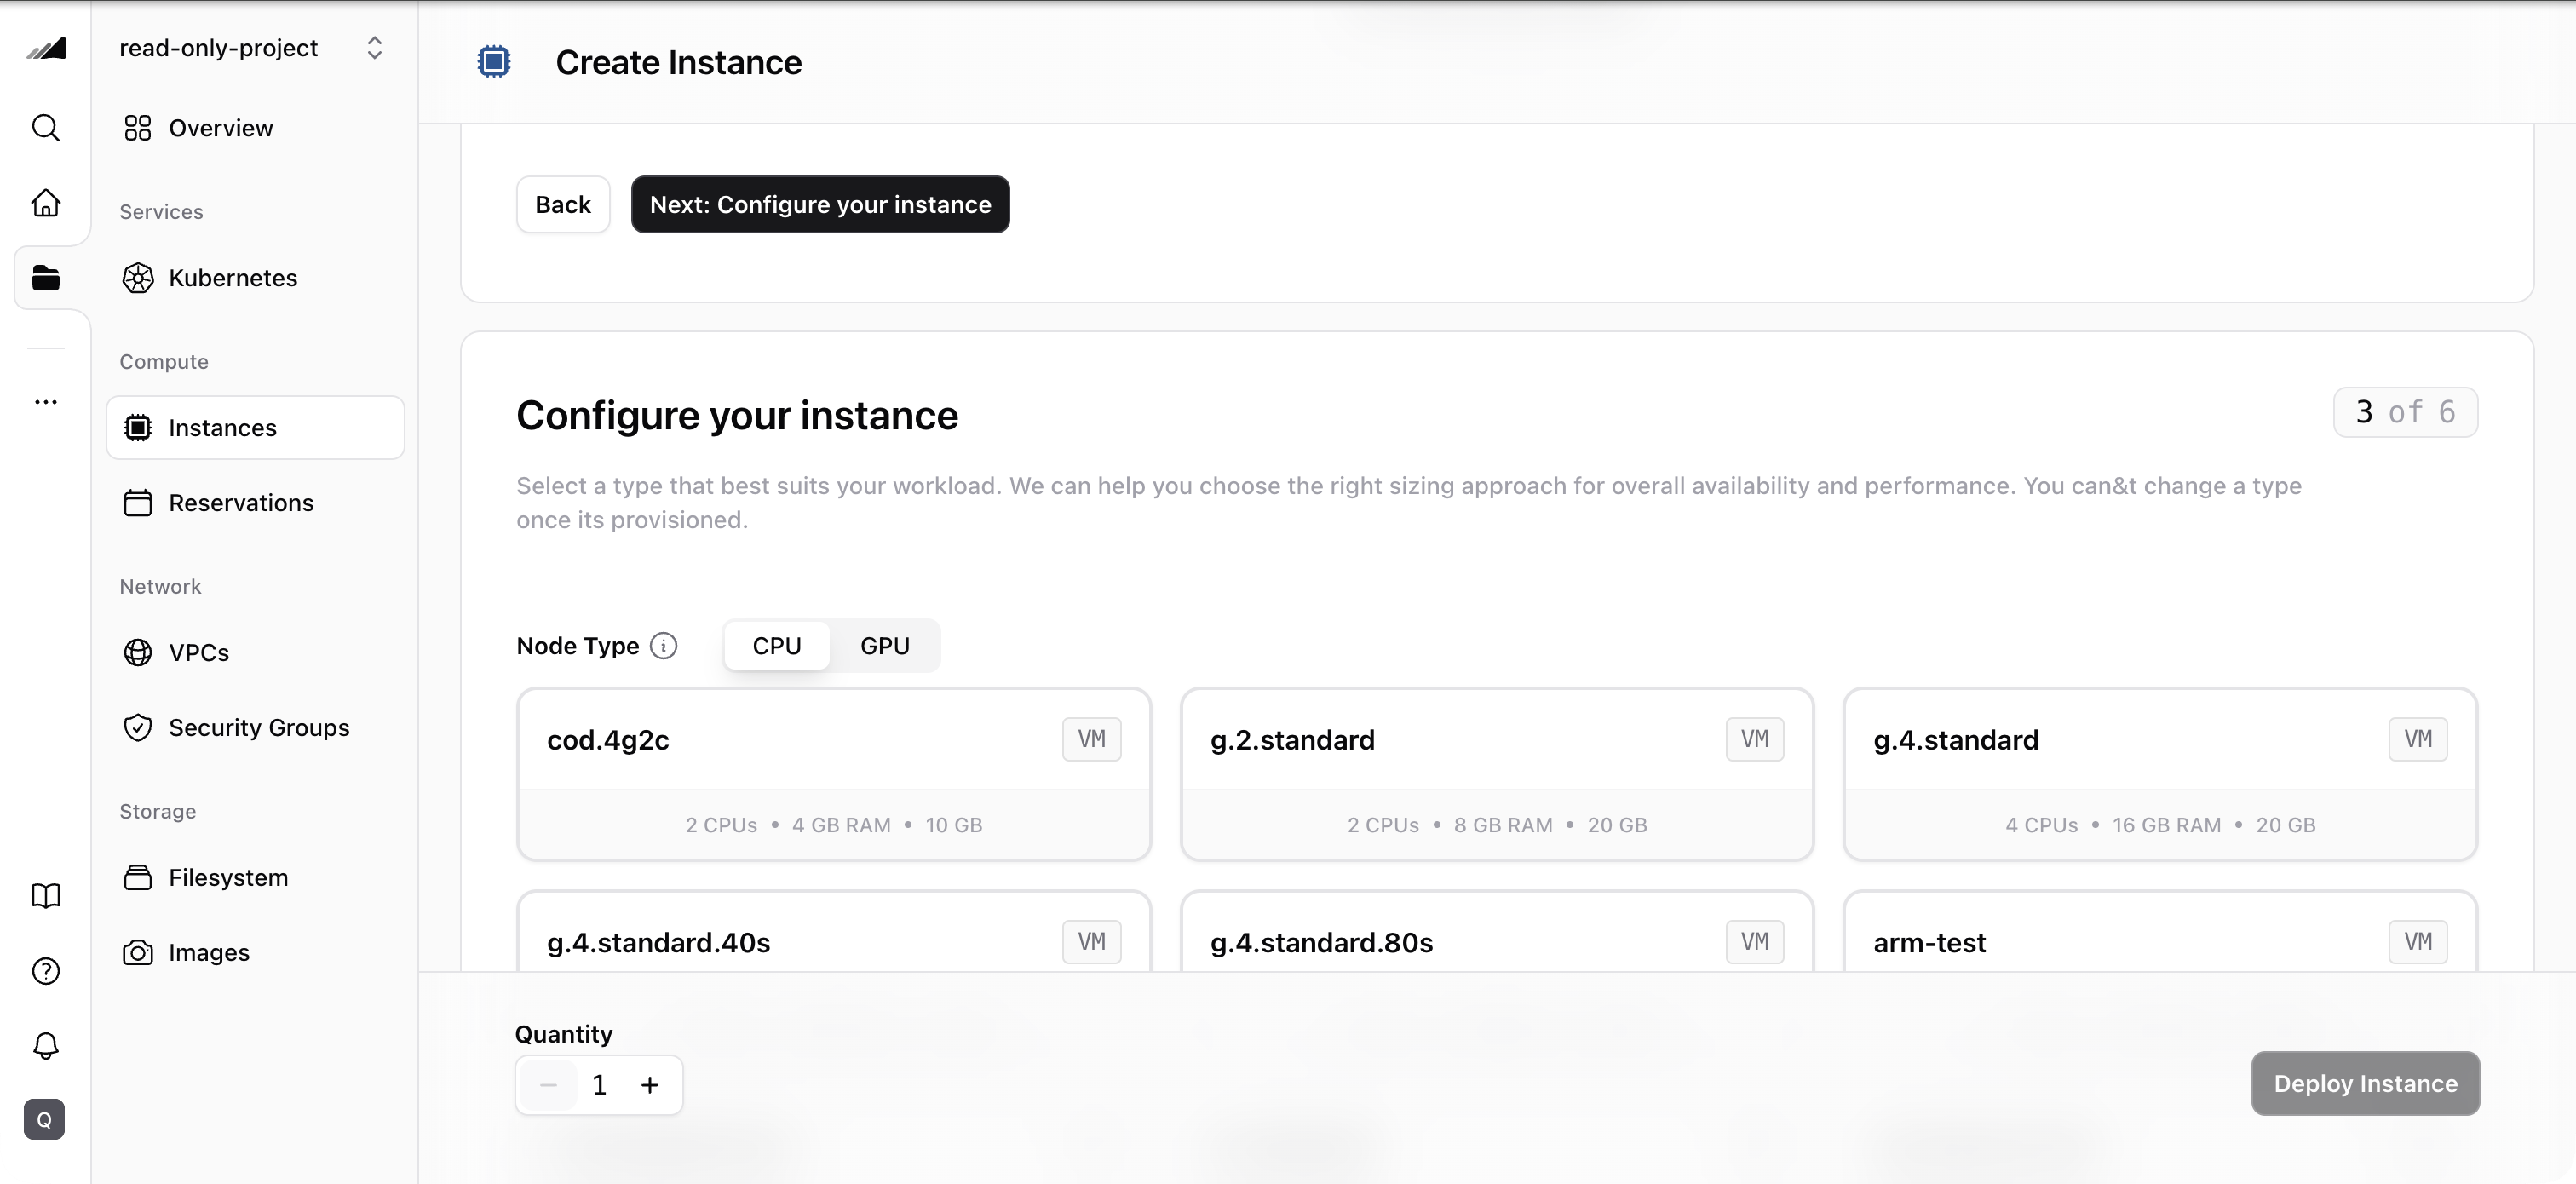
 6. Configure compute + image:
* Choose the **node type**: **CPU** nodes are suited for general workloads, while **GPU** nodes provide accelerated compute for AI/ML training and inference
* Choose the **image** source: **pre-provisioned image**, **custom image**, or **snapshot**
* You should see the selected node type and image reflected in the configuration summary
**Image and node type compatibility:** Images declare a virtualization type — **bare-metal**, **virtualized**, or **any**. Bare-metal images require bare-metal node types and virtualized images require VM node types, while images marked **any** are generic and work with either. The image **architecture** (for example, x86-64 or ARM64) must also match the node type, and the image must fit within the chosen flavor's disk. The console automatically filters the image list to show only images compatible with the selected flavor's architecture. If you change the flavor to a different architecture, any previously selected incompatible image is cleared so you can pick a valid one.
You can optionally provide a **cloud-config YAML** block to run commands or configure packages at boot time. This uses the [cloud-init](https://cloud-init.io/) standard. For example:
```yaml theme={null}
#cloud-config
packages:
- docker.io
runcmd:
- systemctl start docker
```
If you don't need boot-time configuration, leave this empty.
6. Configure compute + image:
* Choose the **node type**: **CPU** nodes are suited for general workloads, while **GPU** nodes provide accelerated compute for AI/ML training and inference
* Choose the **image** source: **pre-provisioned image**, **custom image**, or **snapshot**
* You should see the selected node type and image reflected in the configuration summary
**Image and node type compatibility:** Images declare a virtualization type — **bare-metal**, **virtualized**, or **any**. Bare-metal images require bare-metal node types and virtualized images require VM node types, while images marked **any** are generic and work with either. The image **architecture** (for example, x86-64 or ARM64) must also match the node type, and the image must fit within the chosen flavor's disk. The console automatically filters the image list to show only images compatible with the selected flavor's architecture. If you change the flavor to a different architecture, any previously selected incompatible image is cleared so you can pick a valid one.
You can optionally provide a **cloud-config YAML** block to run commands or configure packages at boot time. This uses the [cloud-init](https://cloud-init.io/) standard. For example:
```yaml theme={null}
#cloud-config
packages:
- docker.io
runcmd:
- systemctl start docker
```
If you don't need boot-time configuration, leave this empty.
 7. Review the configuration summary and click **Create instance**
* The review screen shows your selected configuration including network, security group, SSH key (if set), node type, and image
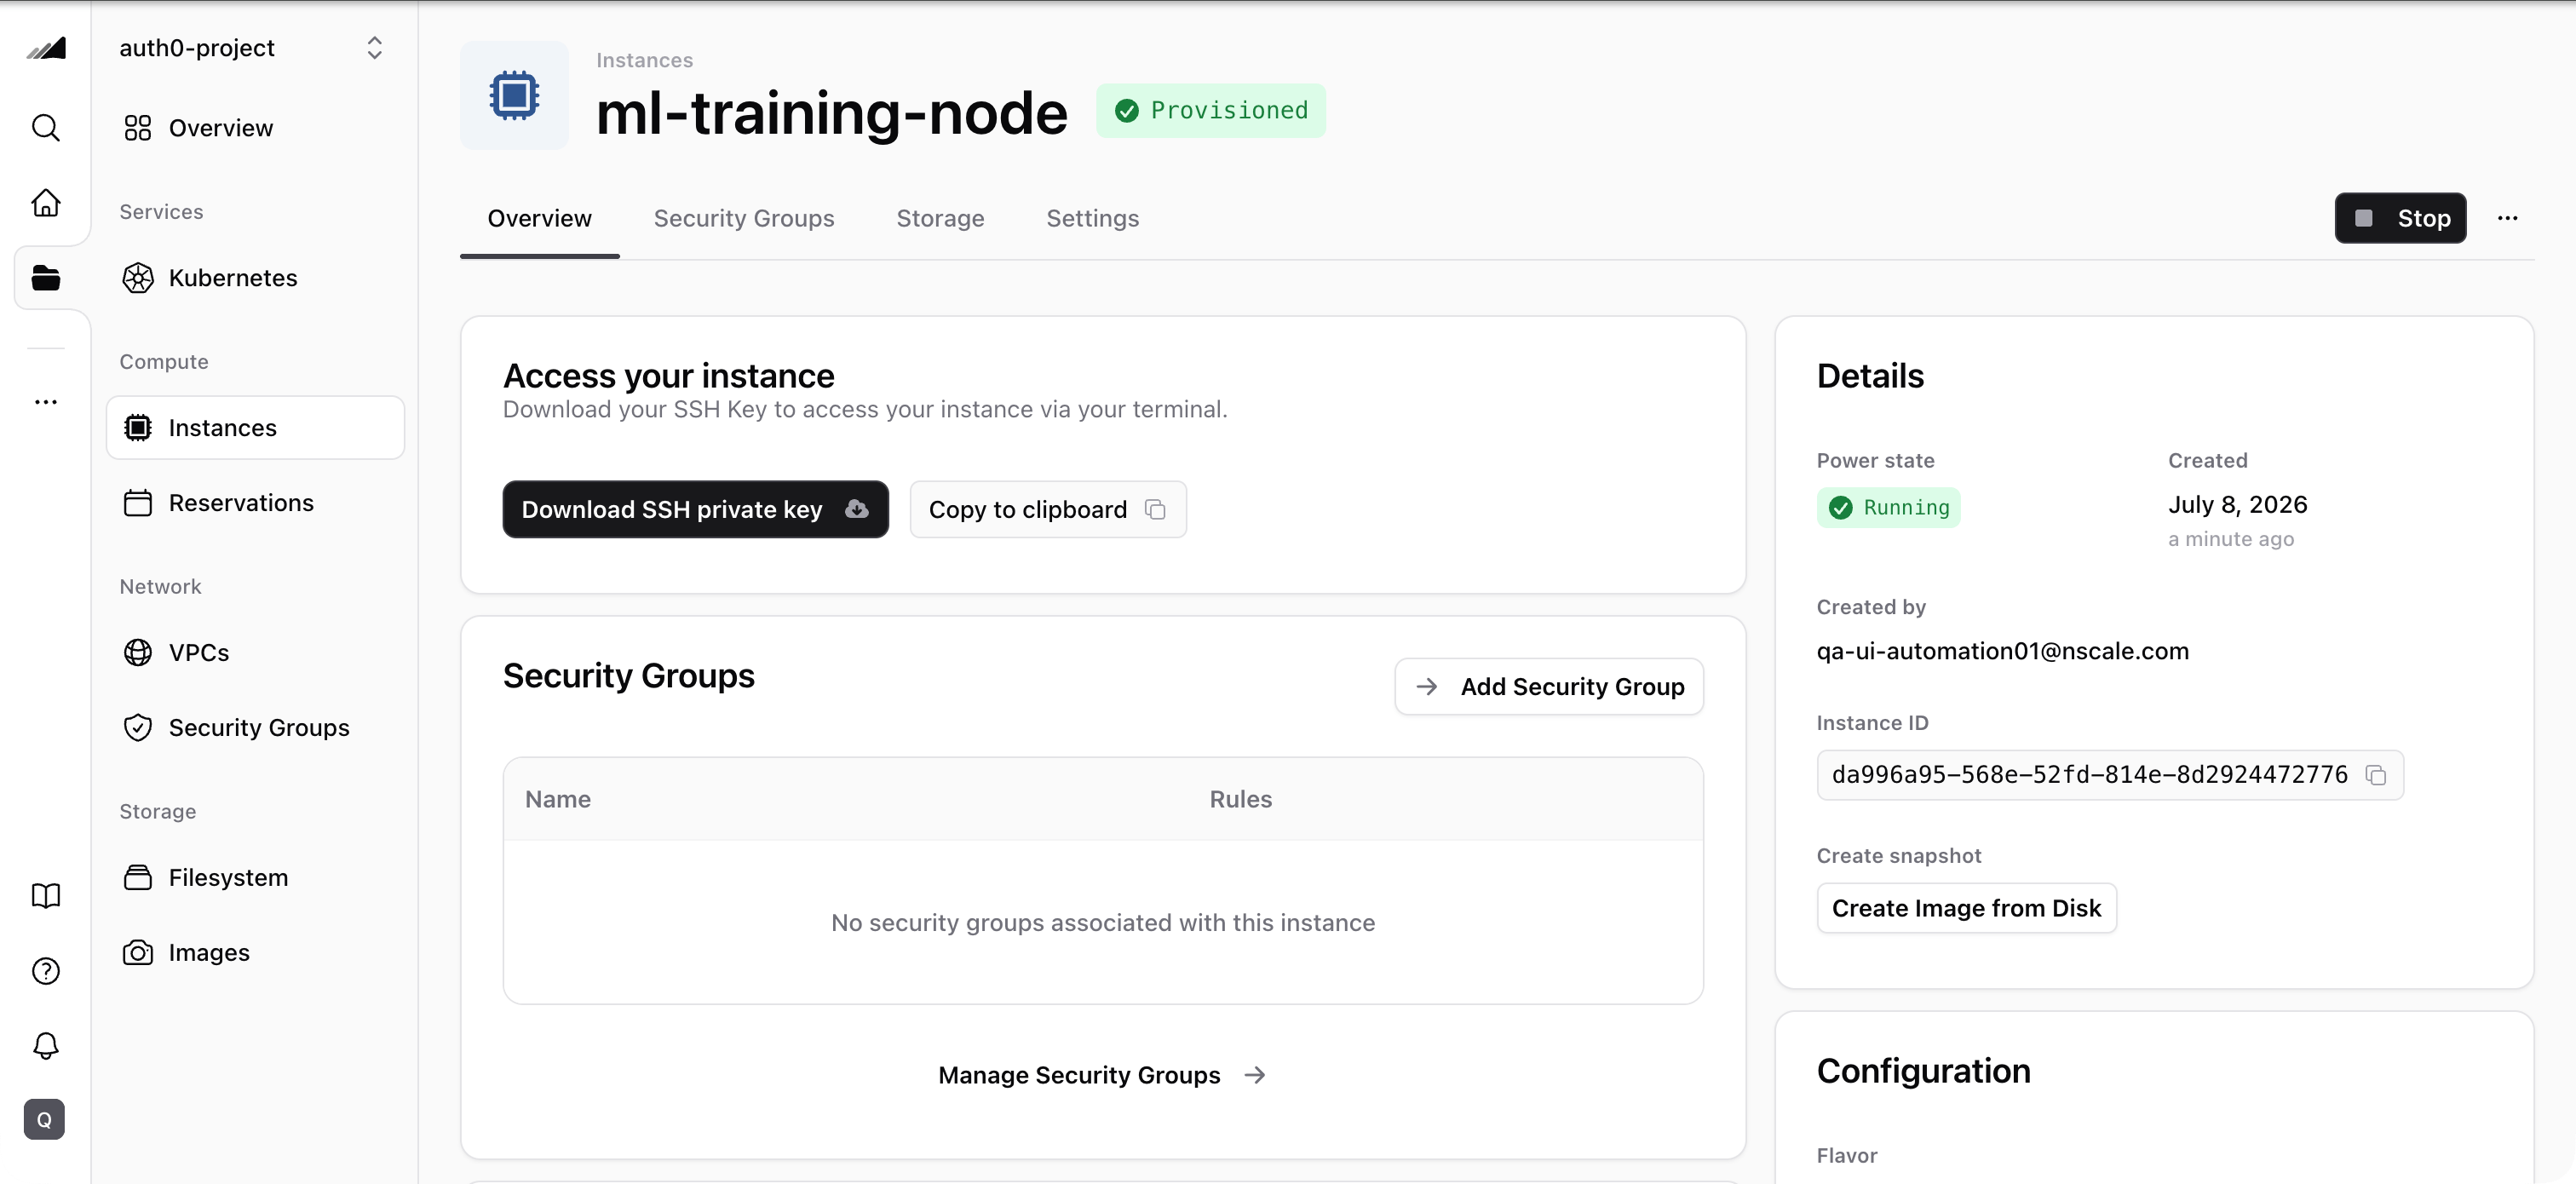
* You should be forwarded to the **instance details page** while provisioning is in progress
* From the details page, you can monitor status and access the instance via terminal
7. Review the configuration summary and click **Create instance**
* The review screen shows your selected configuration including network, security group, SSH key (if set), node type, and image
* You should be forwarded to the **instance details page** while provisioning is in progress
* From the details page, you can monitor status and access the instance via terminal
 ## Quotas
Instance creation consumes quota for servers, GPUs, and floating IPs. If your instance uses a **public IP**, one floating IP is reserved from your project's quota. Check your current quota usage in the **Resource Usage** section on the **Dashboard**.
## Common issues / troubleshooting
* **Symptom:** Instance creation is very slow.
**Likely cause:** You are creating or deleting more than 30 instances at the same time.
**Fix:** Wait for the current batch to complete before starting another. Instance creation/deletion is limited to 50 at a time.
* **Symptom:** You can't connect to your instance via SSH.
**Likely cause:** Your security group doesn't have an inbound rule allowing SSH (TCP port 22).
**Fix:** Go to **Network → Security Groups**, select your security group, and add an inbound rule for TCP port 22 from your IP or `0.0.0.0/0`.
* **Symptom:** Instance creation fails with an image/flavor compatibility error.
**Likely cause:** The image's virtualization type or architecture doesn't match the node type, or the image is too large for the flavor's disk.
**Fix:** Choose an image whose virtualization type matches your node type (or an **any** image) with a matching architecture, and a flavor with enough disk for the image. The console prevents incompatible selections, so this error typically appears only when creating instances via Terraform, the CLI, or the API.
* **Symptom:** Instance creation fails with a quota error for floating IPs.
**Likely cause:** Your project's floating IP quota is exhausted and the instance requests a public IP.
**Fix:** Delete unused instances with public IPs or request a quota increase.
***
## Related
Manage instances from the command line.
Manage security groups from the command line.
This documentation is built and hosted on [Mintlify](https://mintlify.com), a developer documentation platform.
## Quotas
Instance creation consumes quota for servers, GPUs, and floating IPs. If your instance uses a **public IP**, one floating IP is reserved from your project's quota. Check your current quota usage in the **Resource Usage** section on the **Dashboard**.
## Common issues / troubleshooting
* **Symptom:** Instance creation is very slow.
**Likely cause:** You are creating or deleting more than 30 instances at the same time.
**Fix:** Wait for the current batch to complete before starting another. Instance creation/deletion is limited to 50 at a time.
* **Symptom:** You can't connect to your instance via SSH.
**Likely cause:** Your security group doesn't have an inbound rule allowing SSH (TCP port 22).
**Fix:** Go to **Network → Security Groups**, select your security group, and add an inbound rule for TCP port 22 from your IP or `0.0.0.0/0`.
* **Symptom:** Instance creation fails with an image/flavor compatibility error.
**Likely cause:** The image's virtualization type or architecture doesn't match the node type, or the image is too large for the flavor's disk.
**Fix:** Choose an image whose virtualization type matches your node type (or an **any** image) with a matching architecture, and a flavor with enough disk for the image. The console prevents incompatible selections, so this error typically appears only when creating instances via Terraform, the CLI, or the API.
* **Symptom:** Instance creation fails with a quota error for floating IPs.
**Likely cause:** Your project's floating IP quota is exhausted and the instance requests a public IP.
**Fix:** Delete unused instances with public IPs or request a quota increase.
***
## Related
Manage instances from the command line.
Manage security groups from the command line.
This documentation is built and hosted on [Mintlify](https://mintlify.com), a developer documentation platform.