> ## Documentation Index
> Fetch the complete documentation index at: https://docs.internal.nscale.com/llms.txt
> Use this file to discover all available pages before exploring further.
# Testing in Dev
> How to deploy a branch to the shared dev Kubernetes environment and test against it.
## Architecture Overview
Fleet Manager uses a **hub-and-spoke model**:
* The **hub** is in **glo1**: this is the same for both dev and prod.
* **Satellite instances** exist for specific deployments.
* In **dev**, everything currently resides in the **glo1** cluster.
* Dev and prod are on **separate physical networks**. To access nodes or do enrollment testing, you must connect to the **management network** via the dev Kubernetes cluster or the dev VM.
The dev Kubernetes environment is shared. Mention on Slack when you're starting and stopping dev work or end-to-end tests.
***
## Prerequisites
* Access to [Teleport](../start-here/glossary#teleport) ([nscale.teleport.sh](https://nscale.teleport.sh/))
* Membership in the Fleet squad (request access in the fleet squad Slack channel if needed)
* Access to [Argo for the dev cluster](https://fleet-mgr-dev-glo1-argocd.nscale.teleport.sh/applications)
***
## Step 1: Build and push a Docker image
From your branch in the **fleet-manager** repo, run:
```bash theme={null}
make deploy-image
```
This triggers the **Docker build and push** GitHub Action, which creates a tagged image (e.g. `main-` or `-`). You can monitor progress in the [fleet-manager Actions tab](https://github.com/nscaledev/fleet-manager/actions).
## Step 2: Update the Fleet Manager Helm chart
In the `k8s-deploy-fleet-manager` repo, go to `charts/fleet-manager/values.yaml`:
1. Update the **image tag** to match the tag created in Step 1.
2. Update the **chart version** to match your branch name.
```yaml theme={null}
# The image to use for the fleet manager components
image:
# repository:
tag:
# pullPolicy:
# Git reference for ArgoCD applications
# By default, use the latest Fleet Manager tag
chartVersion:
```
Create a new branch and push these changes.
### Testing a configured pinned agent (NetBox agents)
[NetBox](../start-here/glossary#netbox) agent image tags are bundled inside the Fleet Manager hub chart — they're declared in `deployment/charts/hub/release/agent-versions.yaml` in the `fleet-manager` repo, not in this repo's `values.yaml`. To test a custom agent image, edit that file on your fleet-manager branch:
```yaml theme={null}
# deployment/charts/hub/release/agent-versions.yaml
agents:
netboxAgent:
tag: ""
netboxMatrixAgent:
tag: ""
```
Commit and push on your fleet-manager branch. The `chartVersion: ` you set in Step 2 already points the dev [Argo CD](../start-here/glossary#argo-cd) Application at your branch, so the modified `agent-versions.yaml` will flow through when Argo syncs. No additional change in `k8s-deploy-fleet-manager` is required for agent-image testing.
## Step 3: Update the K8s cluster config
In the **k8s-cluster-fleet-manager** repo:
1. Check out or create a branch.
2. Navigate to `glo1/development/fleet-manager.yaml` (since dev is all in glo1).
3. Update the `targetRevision` to match the branch name from Step 2.
4. Push the changes.
## Step 4: Sync via Argo
1. Open Argo (`fleet-mgr-dev-glo1-argocd`) and navigate to the `k8s-cluster-fleet-manager` app.
2. Click on the `k8s-cluster-fleet-manager` node on the left of the diagram.
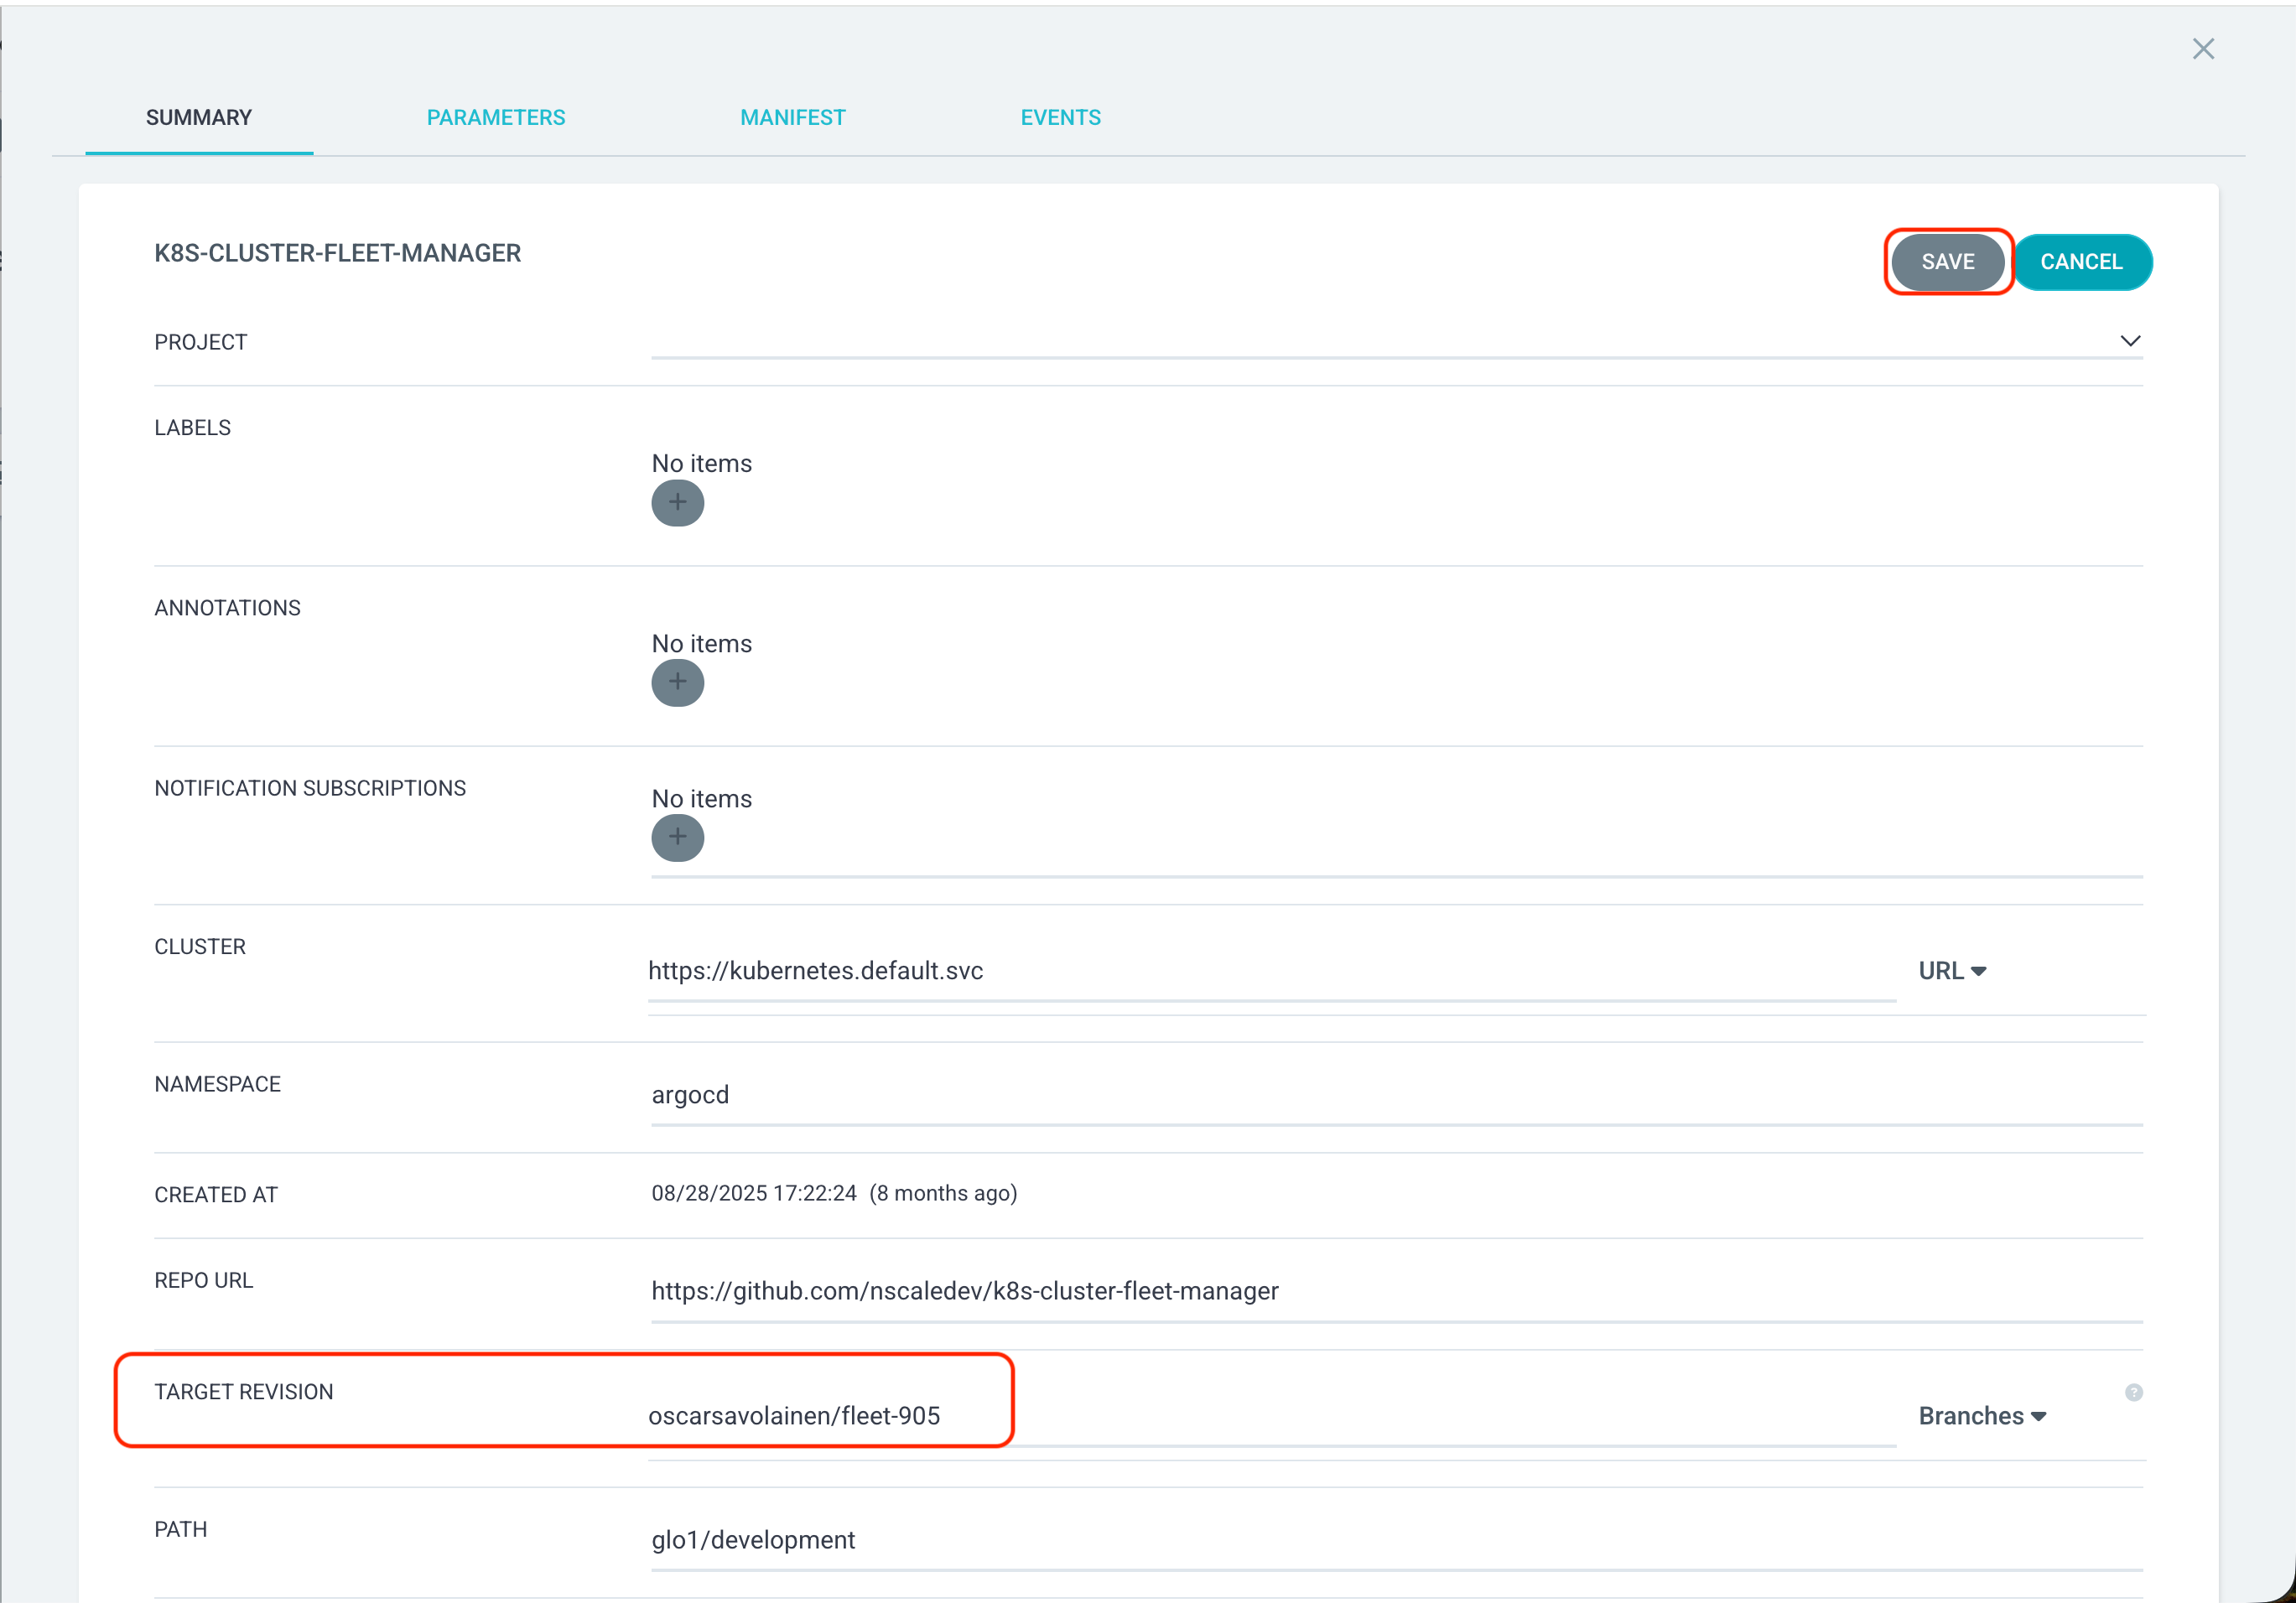
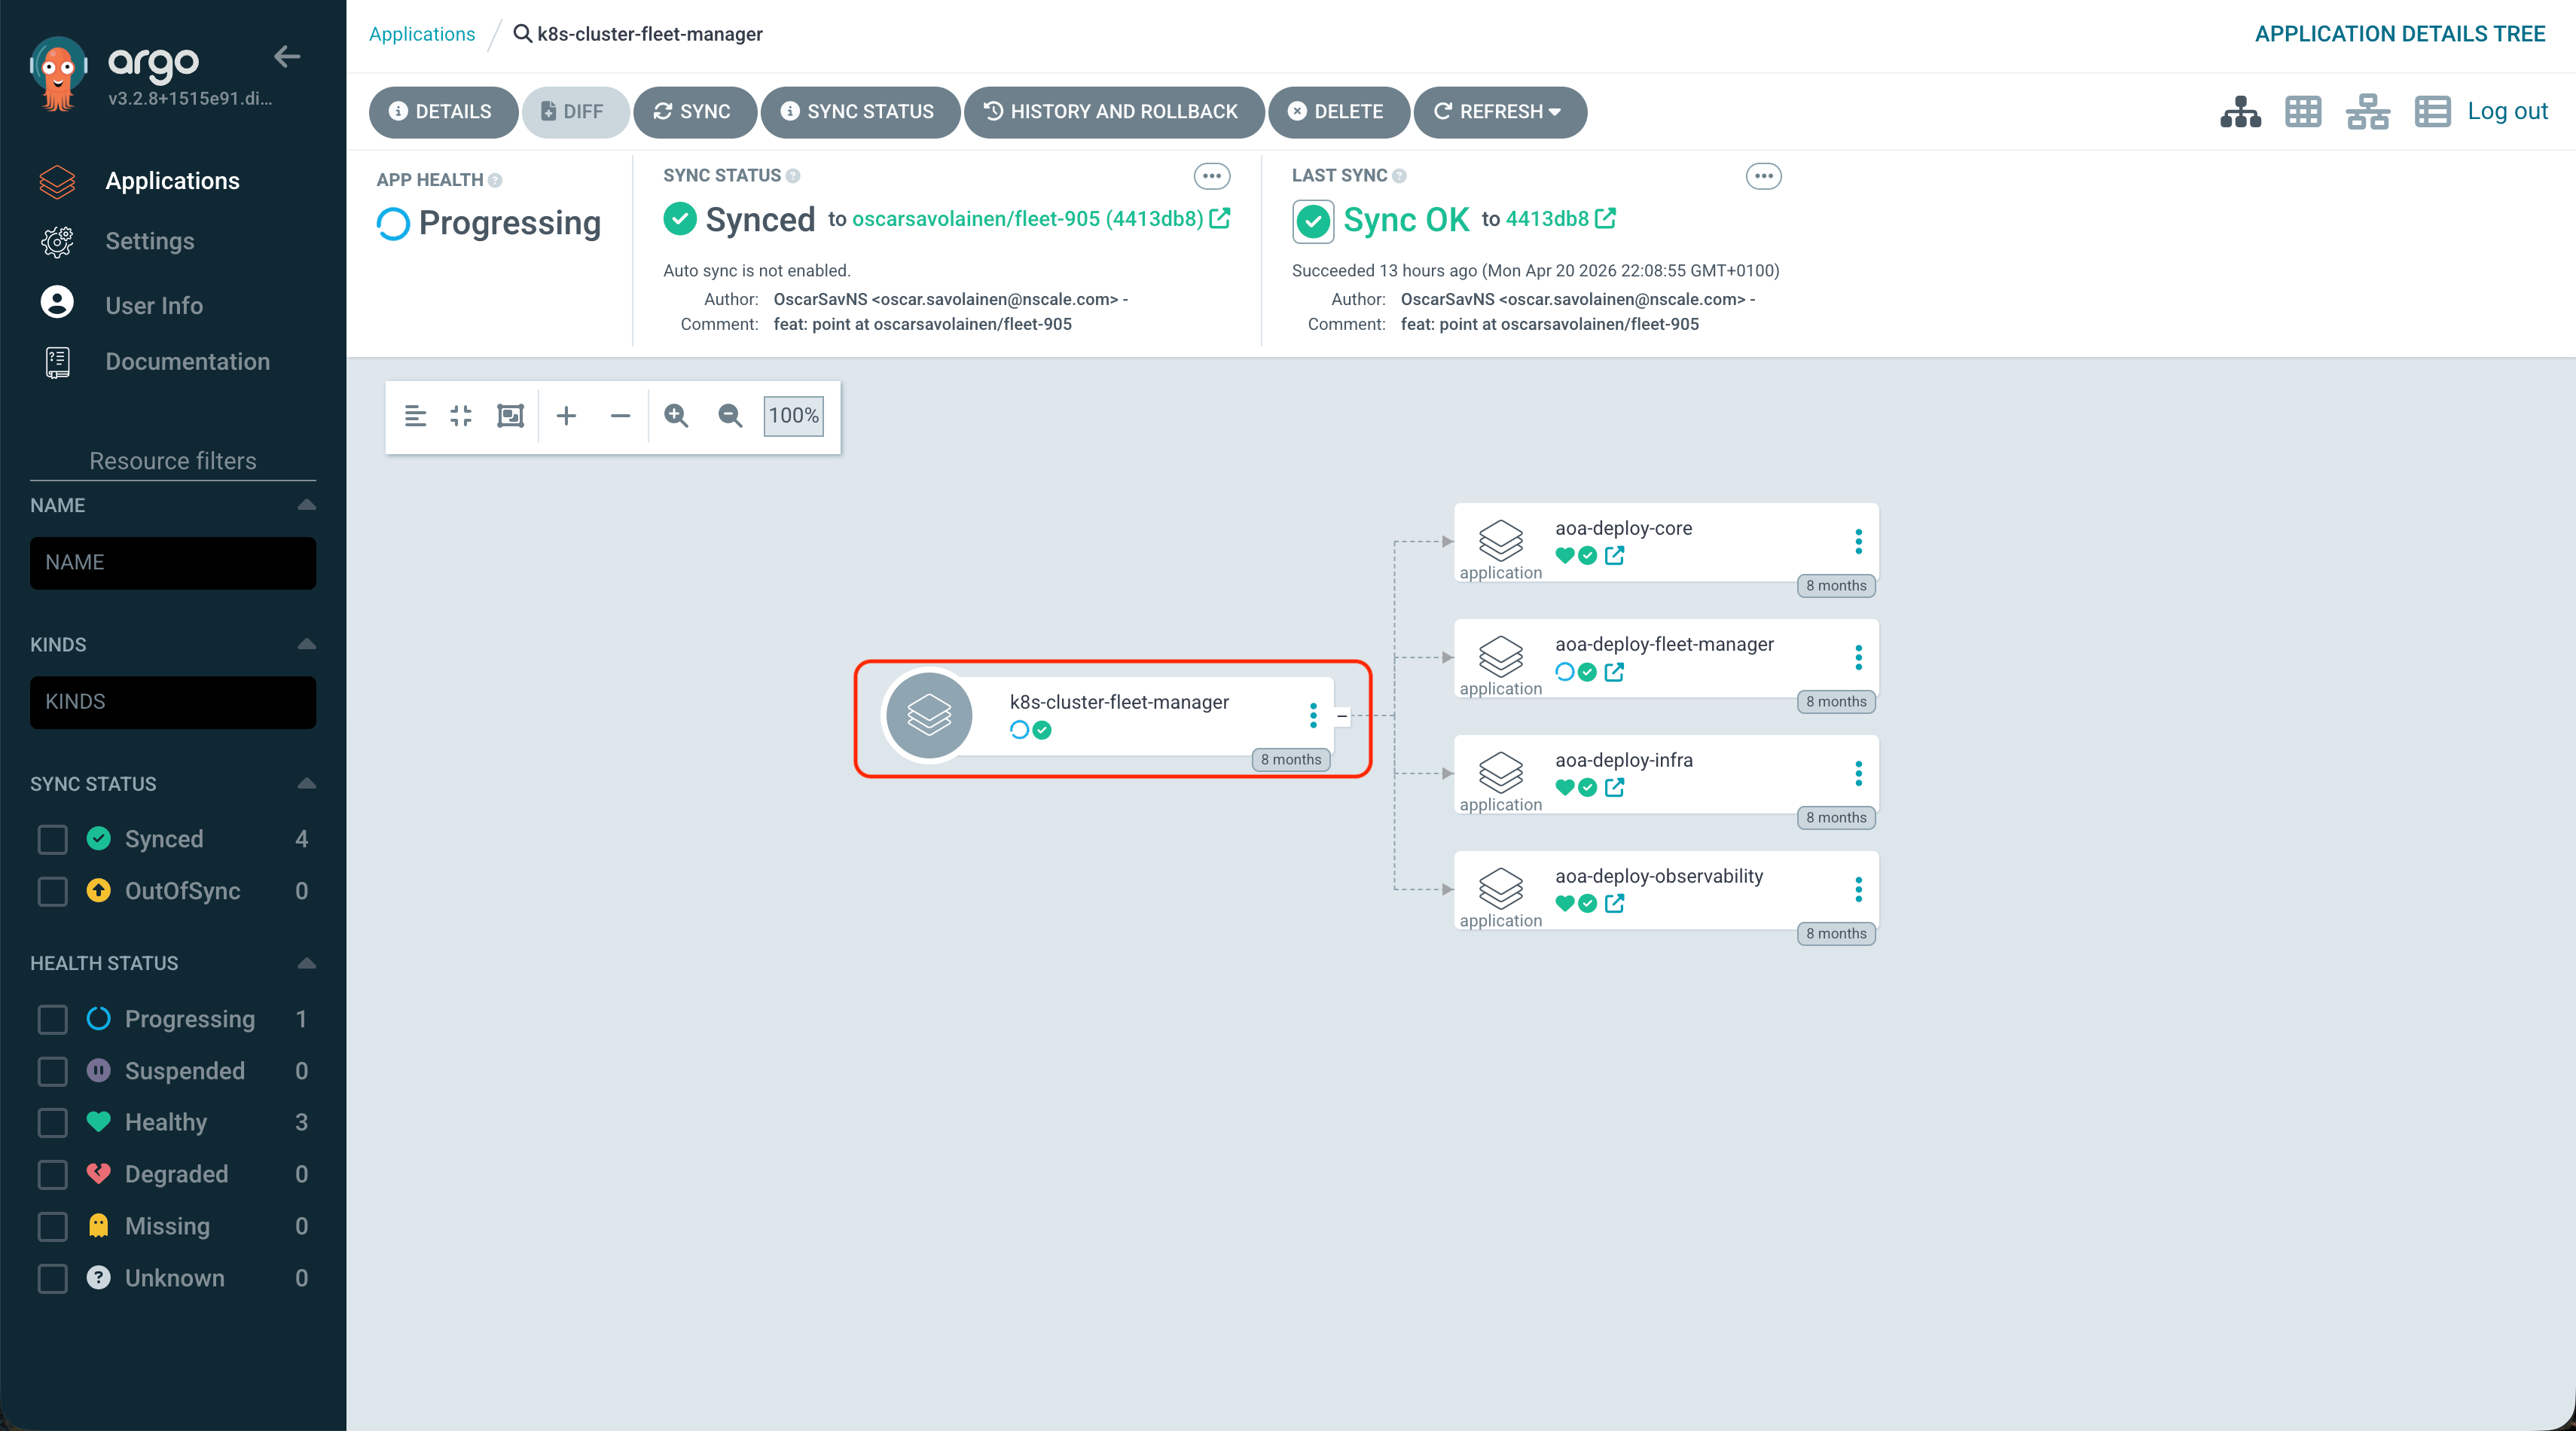 3. Set the **target revision** to your branch name in [**`k8s-cluster-fleet-manager`**](https://github.com/nscaledev/k8s-cluster-fleet-manager) and click **Save**.
 4. Click **Sync** (dev is manually synced).
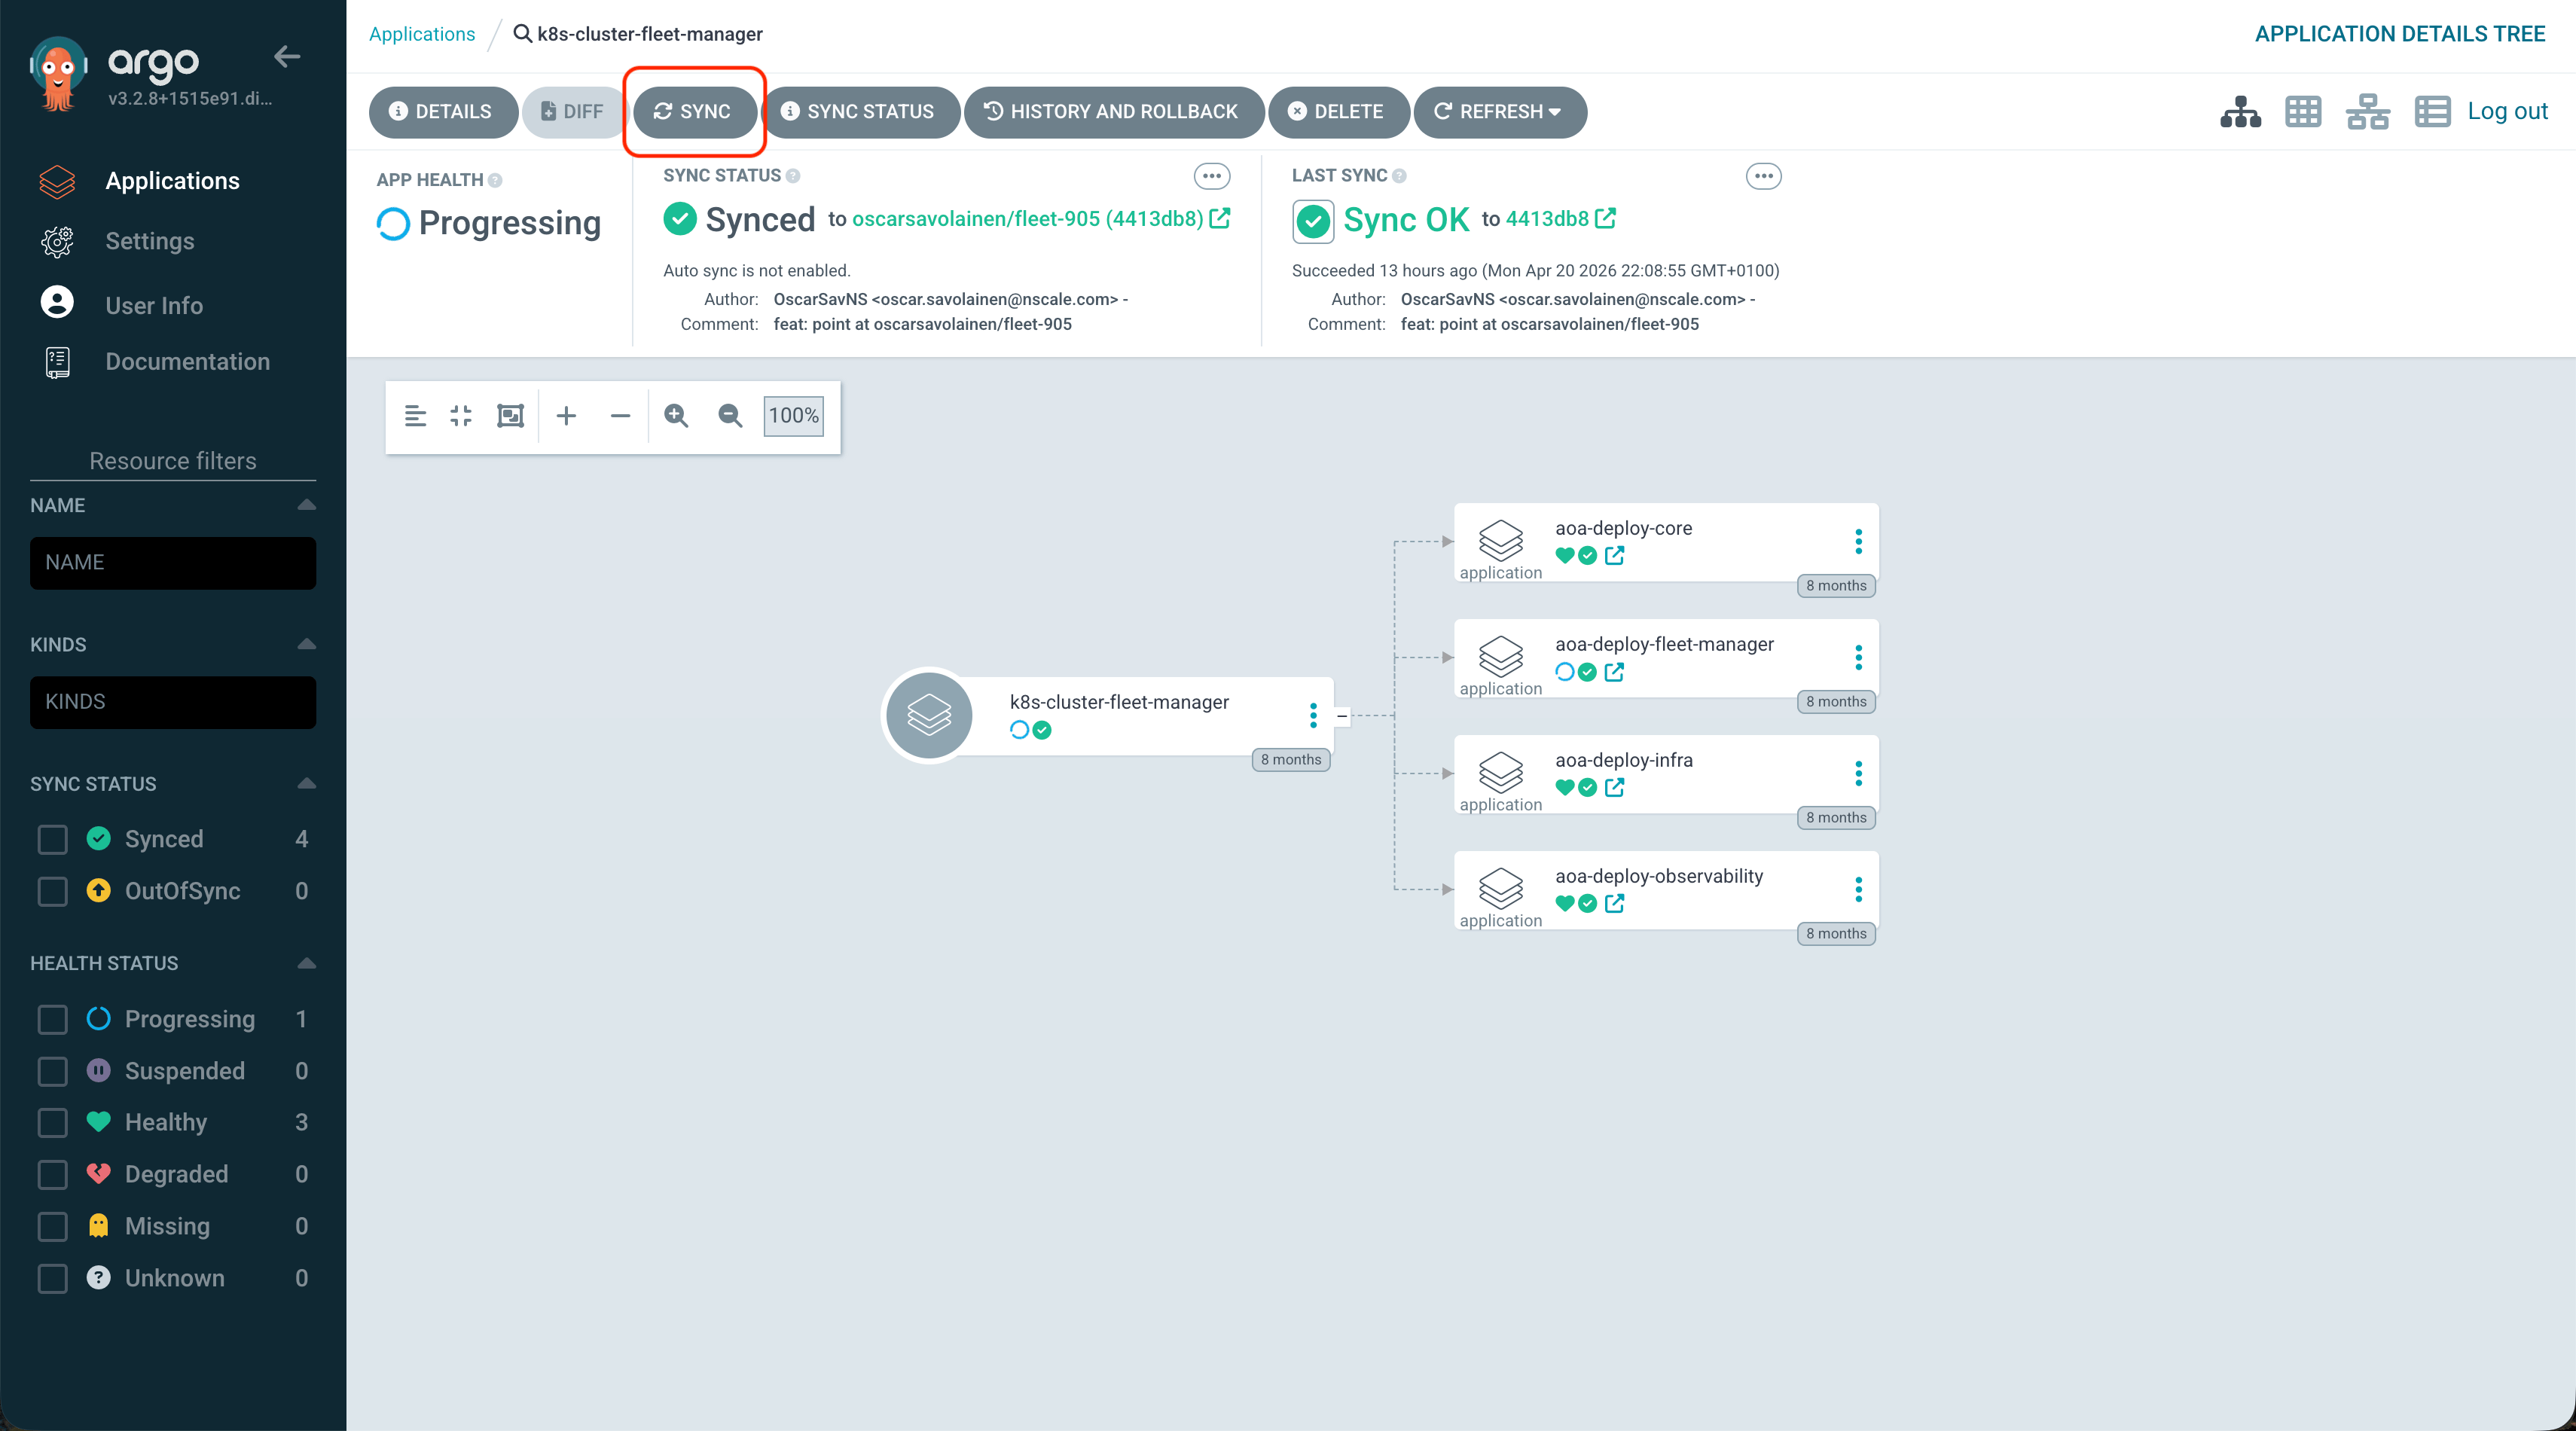 5. Wait for the API migration to run and pods to restart. This typically takes **up to 5 minutes**.
For cluster-only changes (e.g. changing Postgres replicas): if your change only touches `k8s-cluster-fleet-manager`, you can edit directly in the repo, push, and sync. No need to rebuild the Docker image.
## Step 5: Reset the shared dev deployment when done
Once your testing is complete, restore the shared dev environment to `main` so the next engineer starts from a clean baseline.
1. In `k8s-cluster-fleet-manager`, revert `glo1/development/fleet-manager.yaml` to point `targetRevision` back to `main` and push.
2. In Argo (`fleet-mgr-dev-glo1-argocd`), set the **target revision** of `k8s-cluster-fleet-manager` back to `main`.
3. Click **Sync**.
Skipping this step leaves your branch deployment live for the next person and can invalidate their dev verification. Mention on Slack when you have reset the environment.
***
## Testing and Debugging
### Dev health checks
After syncing a dev deployment, verify the shared environment is healthy:
1. Check `#fleetmanager-alerts-dev` for active alerts. No alerts, or clearly healthy alerts, is check 1.
2. Check `#fleet-manager-test-results` for test status. All okay is check 2.
3. Verify the [Fleet Manager dev Grafana dashboard](https://fleet-mgr-dev-glo1-grafana.nscale.teleport.sh/dashboards/f/ffa1fejrf6fpce/?orgId=1) for alerts and related metrics/logs. A healthy dashboard is check 3.
### Hitting the API directly
* API credentials (PKI/CA certs) for dev live in the **Fleet Manager Hub Dev** [1Password](../start-here/glossary#1password) vault.
* Download the certs and use them to hit the API from your local machine.
### Django Admin Panel
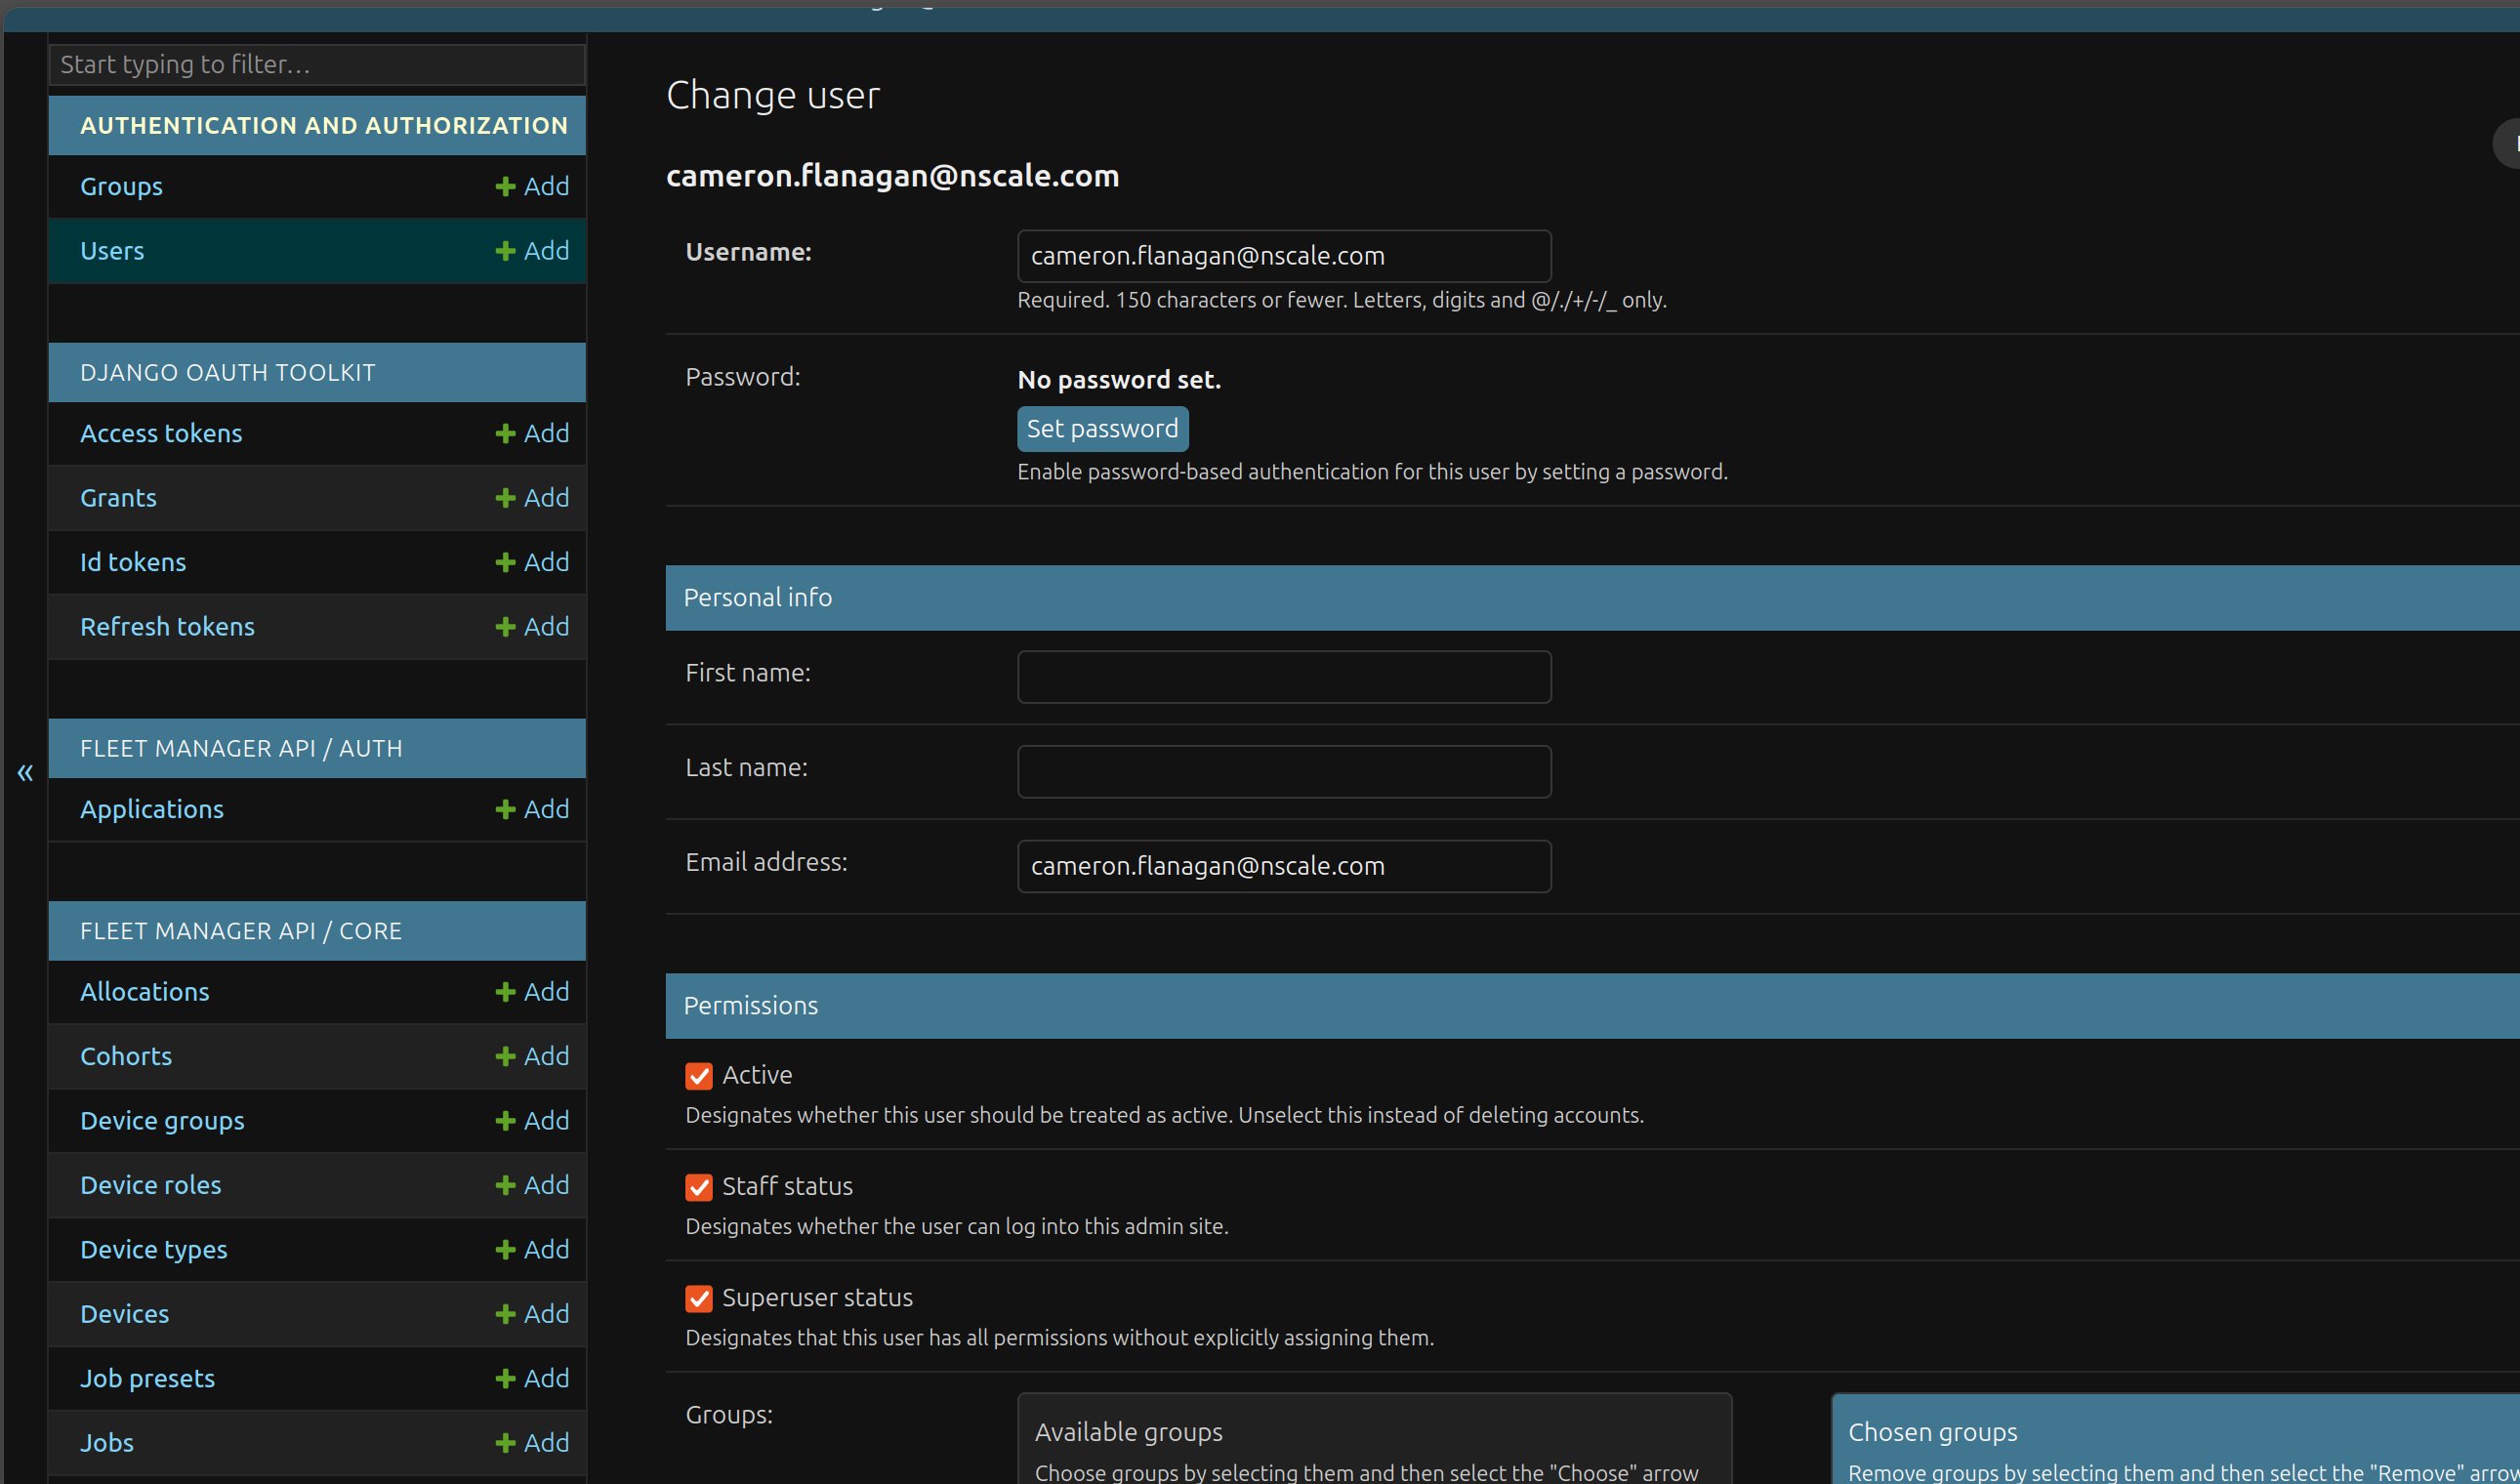
Fleet Manager has a Django backend with an admin panel at [api.fleet.dev.nscale.com/admin](https://api.fleet.dev.nscale.com/admin/) that gives you direct database access, useful for inspecting state and verifying changes.
To get access, request it from the FM squad. A squad member will grant you one or both of:
* **Staff status** — allows login to the admin panel
* **Superuser status** — grants full database access (god mode)
5. Wait for the API migration to run and pods to restart. This typically takes **up to 5 minutes**.
For cluster-only changes (e.g. changing Postgres replicas): if your change only touches `k8s-cluster-fleet-manager`, you can edit directly in the repo, push, and sync. No need to rebuild the Docker image.
## Step 5: Reset the shared dev deployment when done
Once your testing is complete, restore the shared dev environment to `main` so the next engineer starts from a clean baseline.
1. In `k8s-cluster-fleet-manager`, revert `glo1/development/fleet-manager.yaml` to point `targetRevision` back to `main` and push.
2. In Argo (`fleet-mgr-dev-glo1-argocd`), set the **target revision** of `k8s-cluster-fleet-manager` back to `main`.
3. Click **Sync**.
Skipping this step leaves your branch deployment live for the next person and can invalidate their dev verification. Mention on Slack when you have reset the environment.
***
## Testing and Debugging
### Dev health checks
After syncing a dev deployment, verify the shared environment is healthy:
1. Check `#fleetmanager-alerts-dev` for active alerts. No alerts, or clearly healthy alerts, is check 1.
2. Check `#fleet-manager-test-results` for test status. All okay is check 2.
3. Verify the [Fleet Manager dev Grafana dashboard](https://fleet-mgr-dev-glo1-grafana.nscale.teleport.sh/dashboards/f/ffa1fejrf6fpce/?orgId=1) for alerts and related metrics/logs. A healthy dashboard is check 3.
### Hitting the API directly
* API credentials (PKI/CA certs) for dev live in the **Fleet Manager Hub Dev** [1Password](../start-here/glossary#1password) vault.
* Download the certs and use them to hit the API from your local machine.
### Django Admin Panel
Fleet Manager has a Django backend with an admin panel at [api.fleet.dev.nscale.com/admin](https://api.fleet.dev.nscale.com/admin/) that gives you direct database access, useful for inspecting state and verifying changes.
To get access, request it from the FM squad. A squad member will grant you one or both of:
* **Staff status** — allows login to the admin panel
* **Superuser status** — grants full database access (god mode)
 ### UI Testing
You can also test via the Fleet Manager console/UI for anything that maps to a UI workflow
This documentation is built and hosted on [Mintlify](https://mintlify.com), a developer documentation platform.
### UI Testing
You can also test via the Fleet Manager console/UI for anything that maps to a UI workflow
This documentation is built and hosted on [Mintlify](https://mintlify.com), a developer documentation platform.